
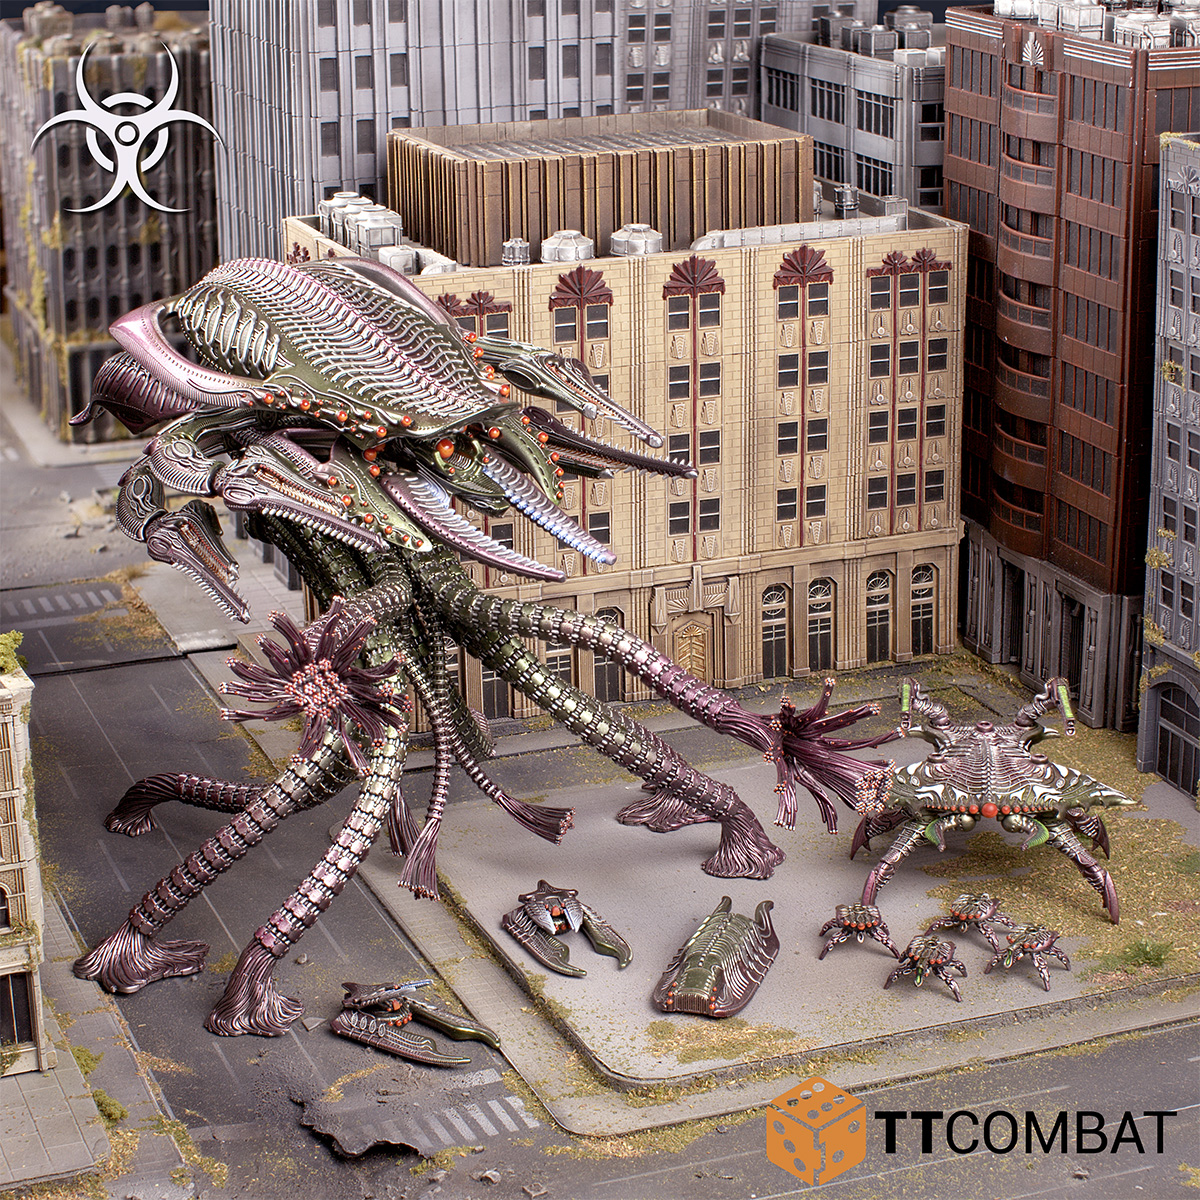
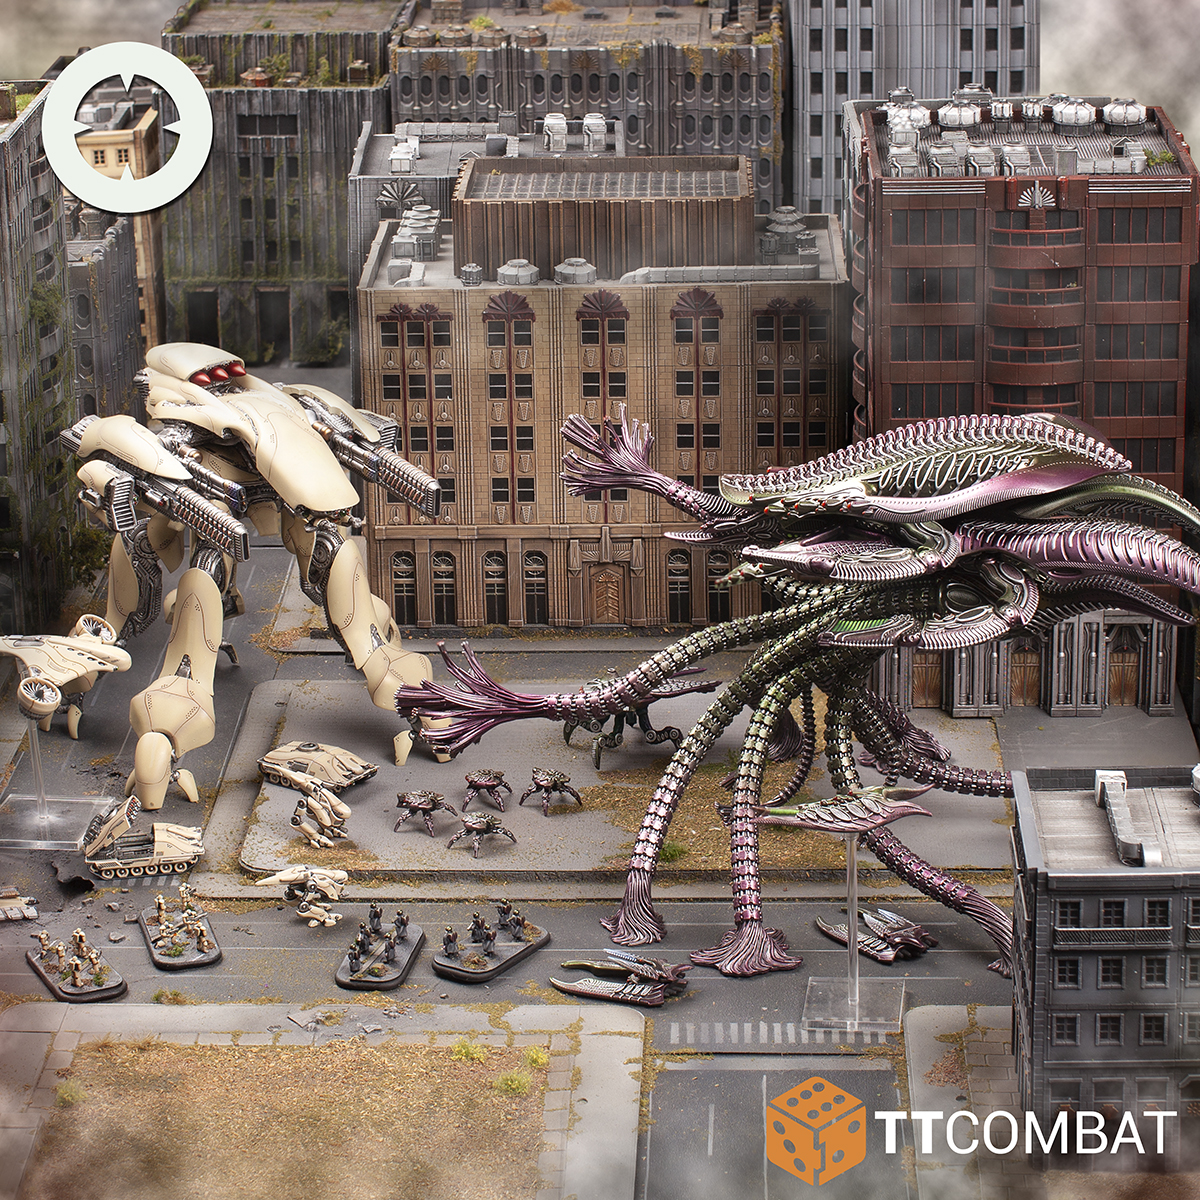
What’s that coming over the hill? It is a monster!
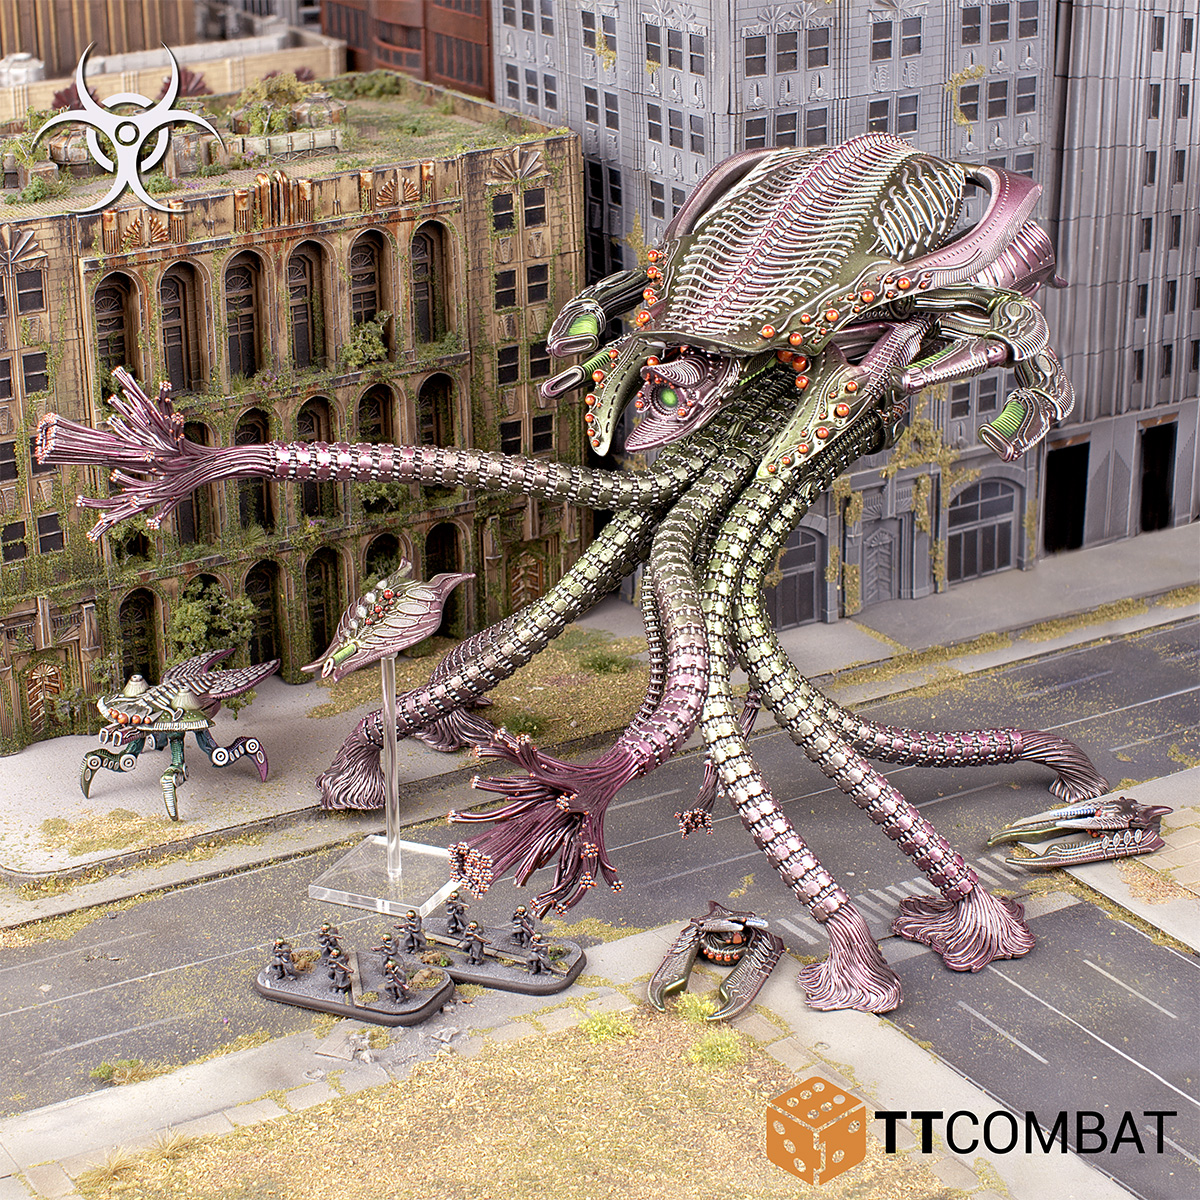
Not just any monster, it’s the Scourge Behemoth!
This incredible new kit is on its way to the pre-order section of the TTCombat webstore later today (3pm!). The single biggest Scourge model ever (including the Scourge Dreadnought), it’s covered in guns and tentacles! You want a nice spin around look?
That’s one gorgeous evil tentacle monster!
In fact, there are eleven tentacles included with the kit. Eight big ones, and three little ones. And if you thought that the PHR Behemoth was poseable, that’s nothing! The Scourge Behemoth’s tentacles actually come completely straight:
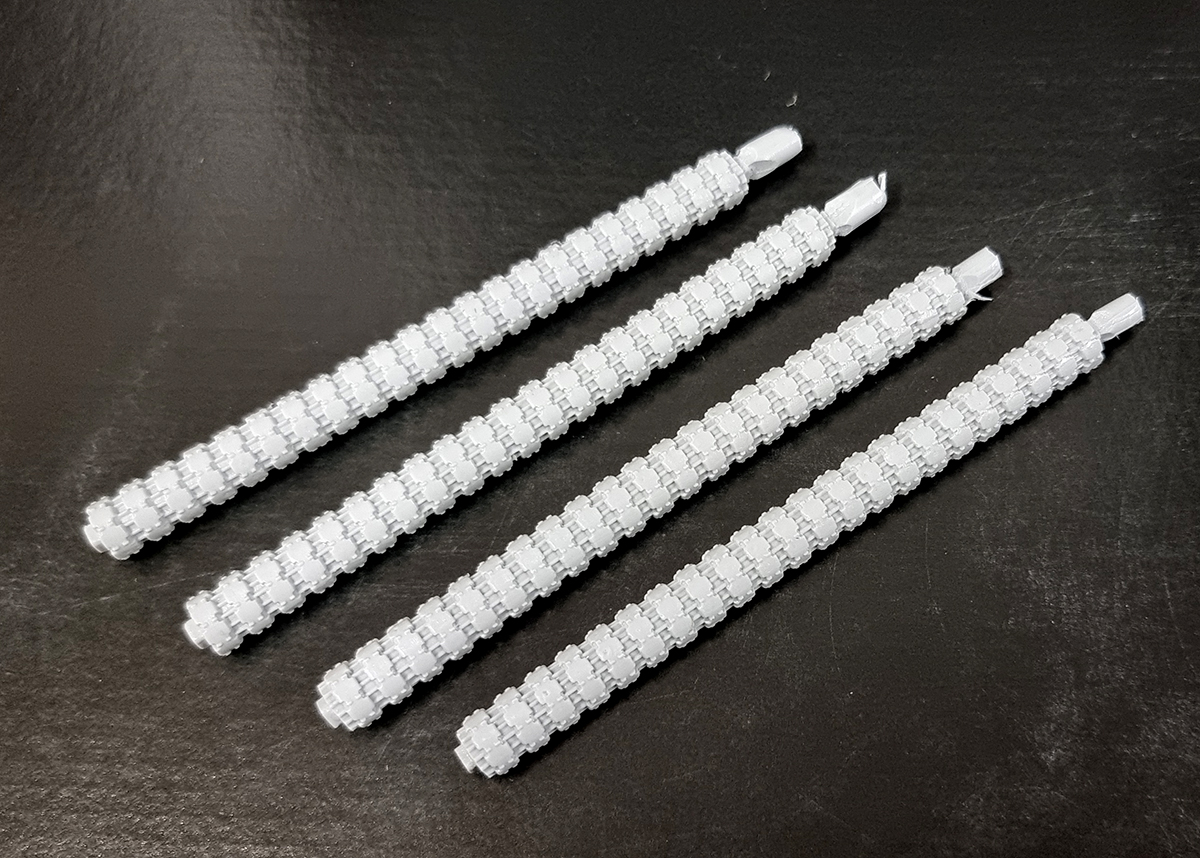
Each of them connects to the main hull with a square locator, and to a “foot” with another square locator. All you need to do is take a hairdryer to them, heat them up a little, and bend them into whatever shape you want.
When Fin was assembling and painting the studio Behemoth, he found it easiest to bend the legs into the approximate shape he wanted first, then to pin them into the body and attach the feet, before making final adjustments with the whole thing assembled. This way you can get the pose you want, but a little last-minute hairdrying means the Behemoth will sit flat on the table as well. The resin is very flexible when heated up, so you can make whatever weird pose you want!
The Weapons
But enough about the modelling side, what does the Scourge Behemoth bring to the table? Well, why don’t we start with those tentacles?
They’re not just a way of getting around the board at speed, they’re actually composed of thousands of tiny filaments, all wrapped around each other to provide strength. However, the Scourge host(s) can splay them out, sending each sailing into and around cover. What looks like a single large vehicle stomper can split out so much that a single thread can pierce the heart of an infantry soldier hiding inside a Garrison!

The Seeker Lashes are the weapon profile for these monstrous tentacles. You get 6 Shots at Energy 4 with Focus (2). That means each shot damages most Infantry on a 3+ which is already scary. But if you want to, you can stack your hits together to go after vehicles too. On average that turns into a single Energy 10 hit, but if you’re lucky it could go all that way to a huge Energy 14, which is enough to even punch a hole in a Behemoth!
Add in that it has the Flame special rule, and you’ll be able to reach into the centre of Garrisons to pull Infantry apart. Behemoths cost a lot of points, which means you’ll often be fighting an uphill battle when it comes to claiming Objectives. The Seeker Lashes really make up for that!
Oh and did I mention that you get three of these weapons on each Behemoth? :O
The Seeker Lashes are actually a secondary weapon though. The Scourge Behemoths primary weapons vary depending on which variant you take. While we saw that the PHR’s Chronus and Tethys have quite defined roles, the Dictator and Tyrant are more generalist. The Tyrant is equipped with a Bio-Cannon and Heavy Plasma Cannons, while the Dictator has an Arc Maw and Static Accelerators.

The Dictator has some of the most esoteric weaponry that the Scourge have to offer. Two pairs of Static Accelerators (those are the long spiny things) give the Dictator some awesome range (a rarity for Scourge), and while they’re not the highest Energy that Behemoths have to offer, they do have Destroyer (5+), which means they can fairly easily hurt any target.
The Arc Maw is a little different though. A super-sized Arc weapon, the Maw fires such a massively concentrated arc beam that it grounds itself in multiple targets, leaping from one to the next.

Although it only has a 12″ range, it can bounce from target to target to get much further away. At Energy 14, you have a great chance of damaging a fair few foes in a row, even ripping into multiple Zones of enemy Behemoths. After a few hits it’s advisable to go after Aircraft, as not only do they typically have lower Armour, but they’re also automatically hit, ignoring any pesky Evasion Countermeasures!

The Tyrant’s weapons do a little bit of everything!
Two pairs of Heavy Plasma Cannons are the most dangerous versions of this weapon we’ve seen to date. With higher range and Energy than their smaller brothers and sisters, these also upgrade to Devastator-2 (All), meaning vehicles and even Behemoths will feel the sting.
The Bio-Cannon is a cousin of the Eradicator’s Bio-Mortar, although much higher powered, and favouring a direct approach. An Area weapon that ignores all Cover is already rather deadly, and it’s a massive Energy 11 as well! That’s deadly to light vehicles, and a risk to even the heaviest enemies. Not only that, but the Bio-Cannon fires a payload of living cells that gradually eat away at enemies:

So anyone unfortunate enough to be touching the template at the end of the round is hit again! This sounds like a great advantage, but in practice it’s a little harder to use. If you activate your Behemoth early on to cause the most carnage, then your opponent can easily just step out of the Area template. But activating it after most enemy units will almost guarantee a second hit, although you have to hope that your opponent doesn’t destroy the Bio-Cannon first!
The Stats
Speaking of destroying weapons, we should have a look at the Scourge Behemtohs’ main stats, and see just how to take one of these big boys down.
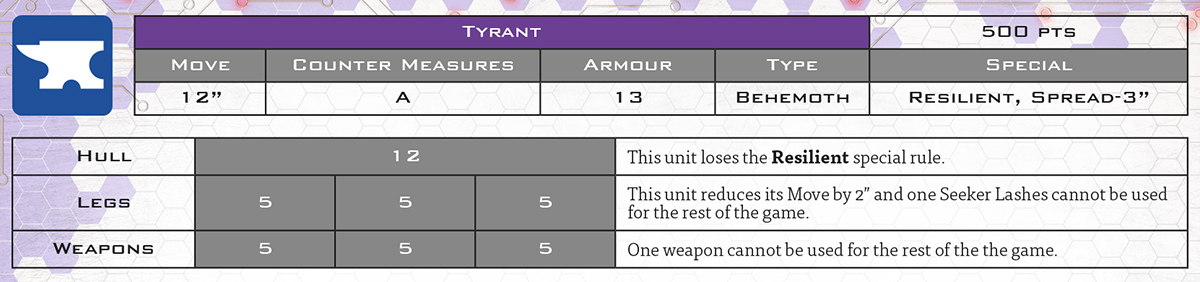
The Scourge Behemoth has the highest Move of all the Behemoths, allowing it to slither its way across the battlefield quickly. Although we’ve seen the weapons already, and moving too fast will stop a fair few of them from firing, so Scourge players should be careful where they deploy. A Drop-Harness will get it stuck in quickly, but walking on the board is still an option, as you can close the gap fairly quickly.
Armour 13 and Resilient should be a familiar sight for Scourge players at this point, as it matches all of their other walkers. In practice this makes the Scourge Behemoth a very strange prospect to face. Armour 13 is not the highest around – it can even be damaged by the Patton’s Autocannon! However, Resilient means that the heaviest weapons are a lot less useful against it. The Crocodile for example is an incredible high Armour destroyer, but is a bit wasted on the Scourge Behemoth, since 1 Energy 14 shot is still just 1 shot.
For anyone fighting a Scourge Behemoth, it means your options for destroying it are a lot more varied than if you were fighting say a PHR Behemoth. However, for Scourge players, it also opens up the “valuable target” list dramatically. Thanks to its abundance of weapons and stomping on things, the Scourge Behemoth can happily go after lighter armour and still be stopping its opponents from hurting it.
If that Resilient is turning into a bit of a problem, then targeting the Hull first is a good idea. It doesn’t lower its Armour like the PHR Behemoth, but removes that special rule, allowing your high Energy weapons to score criticals normal. Having frequently been on the Scourge’s side during playtesting, I can tell you that it takes a long time to cripple the Hull, but once it’s gone, it can go sideways for Scourge players very quickly!
Both the Legs and Weapons are great targets as well. With 5 Damage Points each, you can pass those Damage Thresholds relatively easily, and unlike the PHR Behemoth, taking out the legs also takes out some weapons! If the Seeker Lashes are proving to be too much to take, then destroying the legs is a good idea. Unfortunately for its does, the Scourge Behemoth has enough tentacles to keep moving even when you’ve blasted the legs to pieces. Indeed, destroying them all only halves its Move distance.
As for weapons, I’m not sure which are the best to destroy! The Scourge Behemoth is quite unique because every one of its three weapons is deadly in its own right. Between the three, there aren’t really any “best” choices to destroy. The Arc Maw and Bio-Cannon are great at dealing with groups of enemies, while the Heavy Plasma Cannons and Static Accelerators excel at taking out heavy armour. It all depends on how the game plays out!
Stat Sheets
As with the PHR Behemoth (and all other Dropzone units), the stats for the Tyrant and Dictator will be available both on the Dropzone Army Builder and as stat sheets in the Resources section. And as with the PHR one, there are also some optional extra sheets for keeping track of damage.
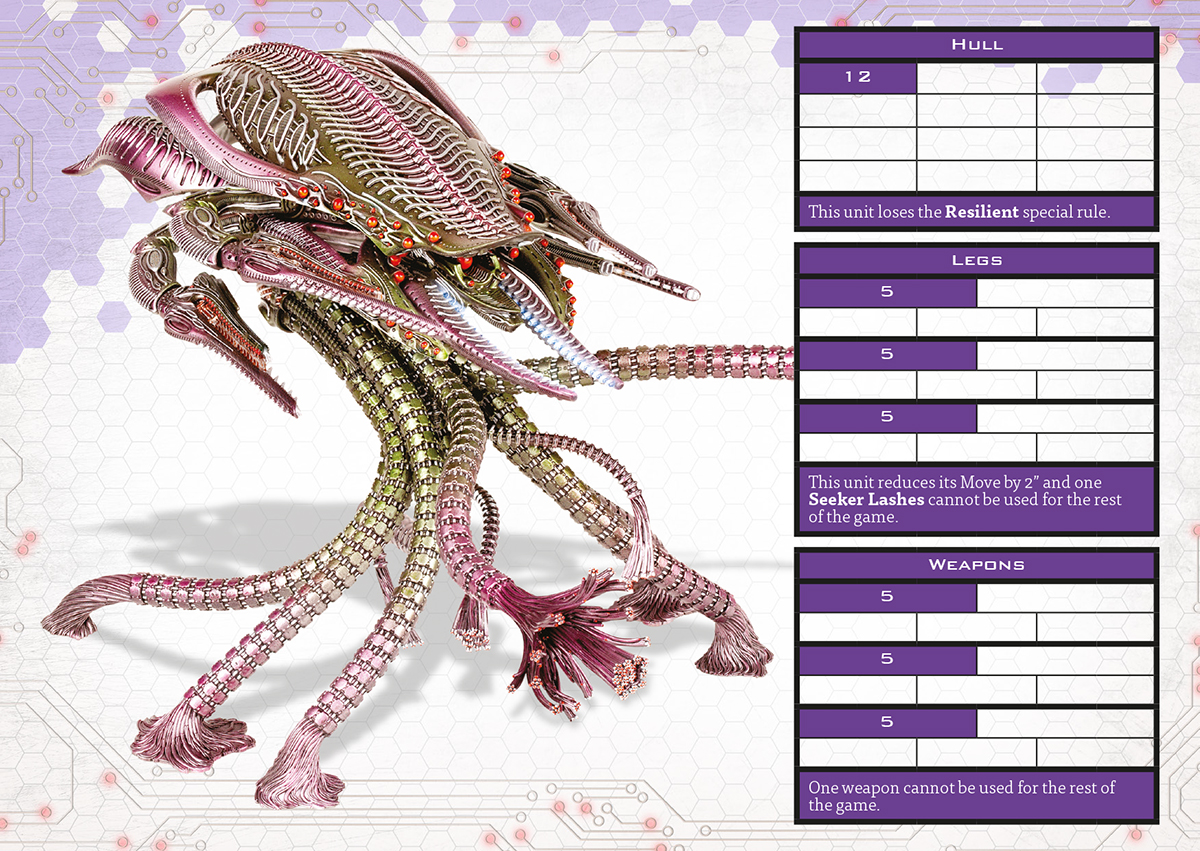
In fact, we’ve made two styles for each Behemoth, so you can choose which one you like using best! This version has a gorgeous picture of the miniature, which should help to give some ideas for posing. The arms come in three pieces as well, so it’s not just the tentacles you can pose!
Both Behemoths will be available to pre-order later today! It’s an exciting day for Dropzone, that’s for sure!
Have you got ideas how you’re going to model your tentacled monster? Are you looking forward to waging some kind of war of the worlds? Let us know, and make sure to check back at 3pm to pre-order your own Behemoth on the TTCombat webstore!