We’re back again, this time with the Resistance Cruisers!
Yesterday we took a peek at some of the possibilities in the Frigates sprue, and today we’re going to do to the same for the Cruisers, seeing as the Resistance Starter Fleet is on pre-order right now!
I’m going to put out a number here. I’ve done the maths on it, and I’m pretty sure it’s correct. But the last time I studied maths was at GCSE, which was… more years ago than I’d like to admit.
Without accounting for weapons pointing in different directions, or double engines, you can make over 10,000,000,000 different combinations of Cruiser. That’s 10 billion. That’s kind of insane. The caveat is that not all of those are legal ship builds for your games of Dropfleet Commander!
I’m not going to show my working here (maybe in another post once everyone has the sprues in their hands), so let’s instead get stuck in!
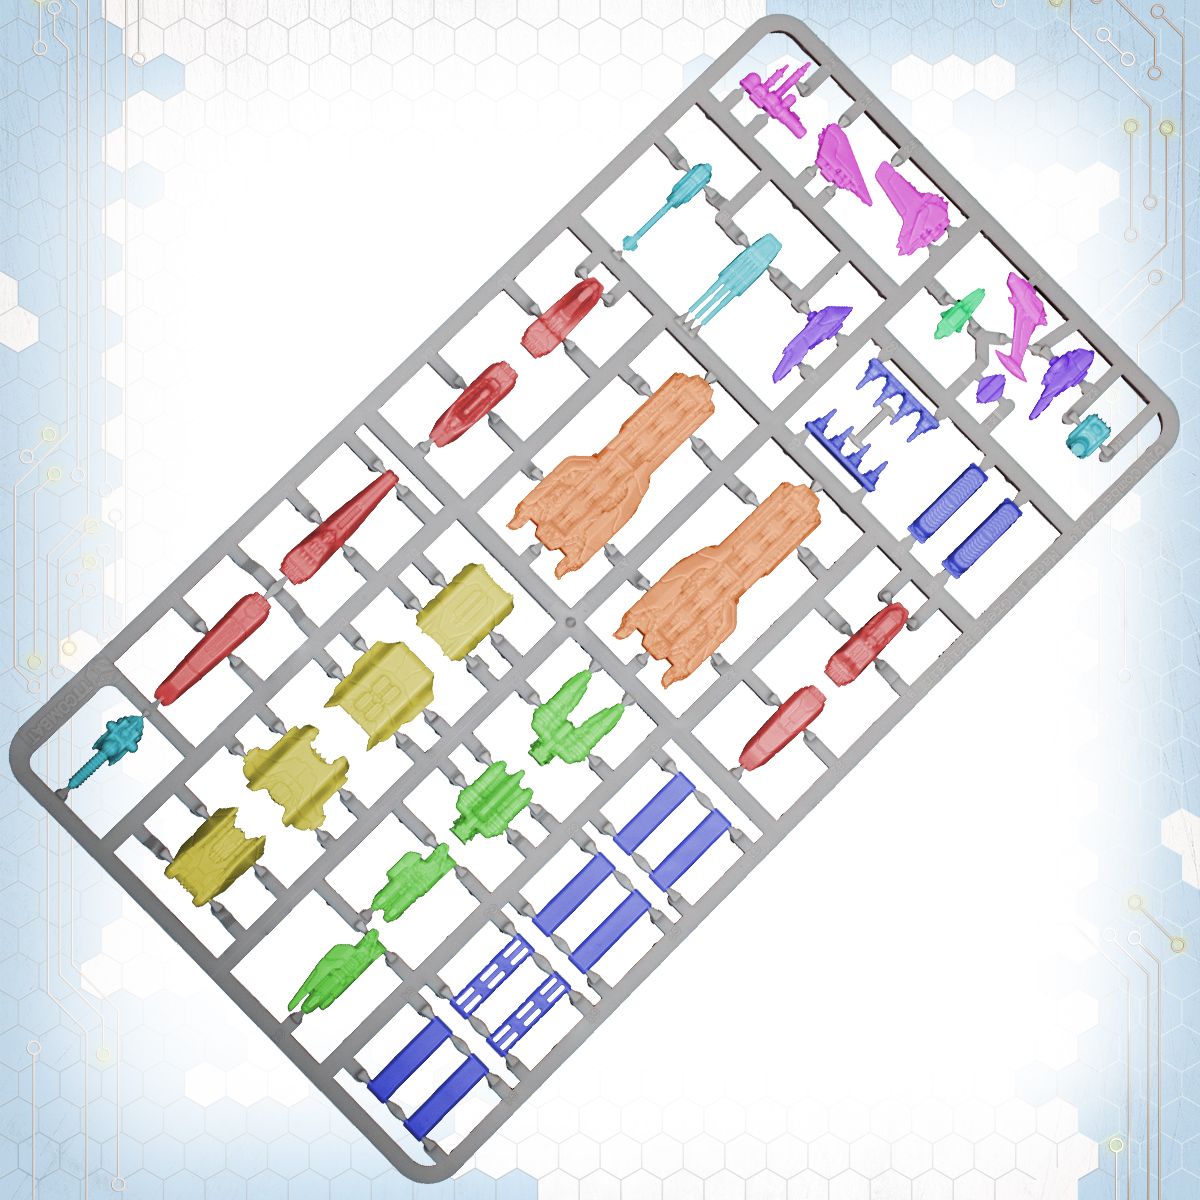
The Sprue
The Resistance Cruiser sprue – much like all the other factions’ Cruisers – builds one ship each. However, unlike the other ships, this has a ridiculous amount of modularity. You can make three types of Cruiser with this sprue: Light, Medium, and Heavy.
We’ll go through the parts colour by colour:
Orange: Hull. Just the one hull, made from two parts. This can go front heavy or back heavy much like the Frigates.
Red: Prows. Where the Frigates have one prow block each, the Cruiser prows are made by combining any two of the prow halves. You get 6 different designs of prow half, and you can double up with multiple sprues.
Green: Engines. Much like the prows, the engines come in two halves, giving a massive variety of looks. Swapping the engines and prows over from one end to the other gives really different looks to your Cruisers. Oh and you can always forgo the engines on the back and go double prow – more on that in a minute.
We’ll pause here for a second to talk about hard points.
There are four types of hard point mount on the Cruisers: broadsides, rails, turrets, and prow/engines. The basic hull has slots for four broadsides and four rails. Bear that in mind as we go through the rest.
Yellow: Armour. These armour upgrades are available to all three types of Cruiser. Where giving armour to a Frigate makes it a Heavy Frigate, any type of Cruiser can have armour. The armour plates attach to any rail mount. You only have to have one to count as upgrading to Ablative Armour, but the more you put on, the bulkier your ship looks.
Pink: Scanners & Gubbinz. There are four additional pieces on this sprue affectionately known as “space gubbinz”. The two central ones we most frequently use as the Scanner Array upgrade, with the antennae cluster and arm cockpit as additional extras. However, if you want to use any or all or none of these as Scanner Arrays, go ahead! The scanner gubbinz attach to any rail mount.
Purple: Turret Mounts. There are three different turret mounts – two larger ones and a very small one. Each of these attaches to a rail mount and in turn has on it a turret mount. Any of the rail mount attachments can go on any of the four places on the hull, and are called rail mounts because they have quite a lot of movement to slide up and down the rails to attach where you want.
Light Blue: Turrets. With four different weapon turrets you have a lot of scope for making different ships! Bottom left we have a Vent Cannon, the two at the top are a Mass Driver and an Artillery Cannon, and the little one on the right is a Bombardment Mortar. Because of the turret mounts, all of these weapons can be pivoted around 360 degrees (although we haven’t taken that into account with our 10 billion number).
Dark Blue: Broadsides. Probably what a lot of PHR players have been waiting for! The Cruiser sprue can have empty broadside bays which look absolutely fine, especially on a Light Cruiser. However, there are also broadsides for Hybrid Guns, Artillery Cannons (yes, the same type as the turret), and Missile Banks. But that’s not all! There is also a set of Bulk Lander & Fire Ship hangers and a set of Fighters & Bombers launch bays. I know what you’re thinking: “But there are six broadsides there, not five!” Well, this is where it gets a bit complicated.
Dark Blue 2: Rail broadsides. There is a pair of broadside pieces that turn your broadside mounts into rail mounts. That means you have four extra places to put rail mounted pieces. Yep. All of the yellow, pink, and purple pieces can be mounted on the side too!
Teal: Engine mount. Okay, if you’ve got your head around the possibilities of the rail broadside, here’s one more piece. This piece turns your rail mounts into prow/engine mounts. Yes, including any from the rail broadsides. I’ll be honest here – most of the prows don’t fit exactly using this mount, so we haven’t included them in our count. With a small amount of cutting and gap filling though you can easily add them. The real benefit here is that you can put engines all over the ship! You know I said you can do a double prow? This is how you still give it engines! It also allows you to take the Drive Refit upgrade to increase your speed. We don’t have any hard and fast (pun intended) rules on how many engines you need for a drive refit, but it’s between many and lots.
Phew! Those are all the pieces. It’s… well it’s quite a kit!
So without more talking, let’s see some examples!
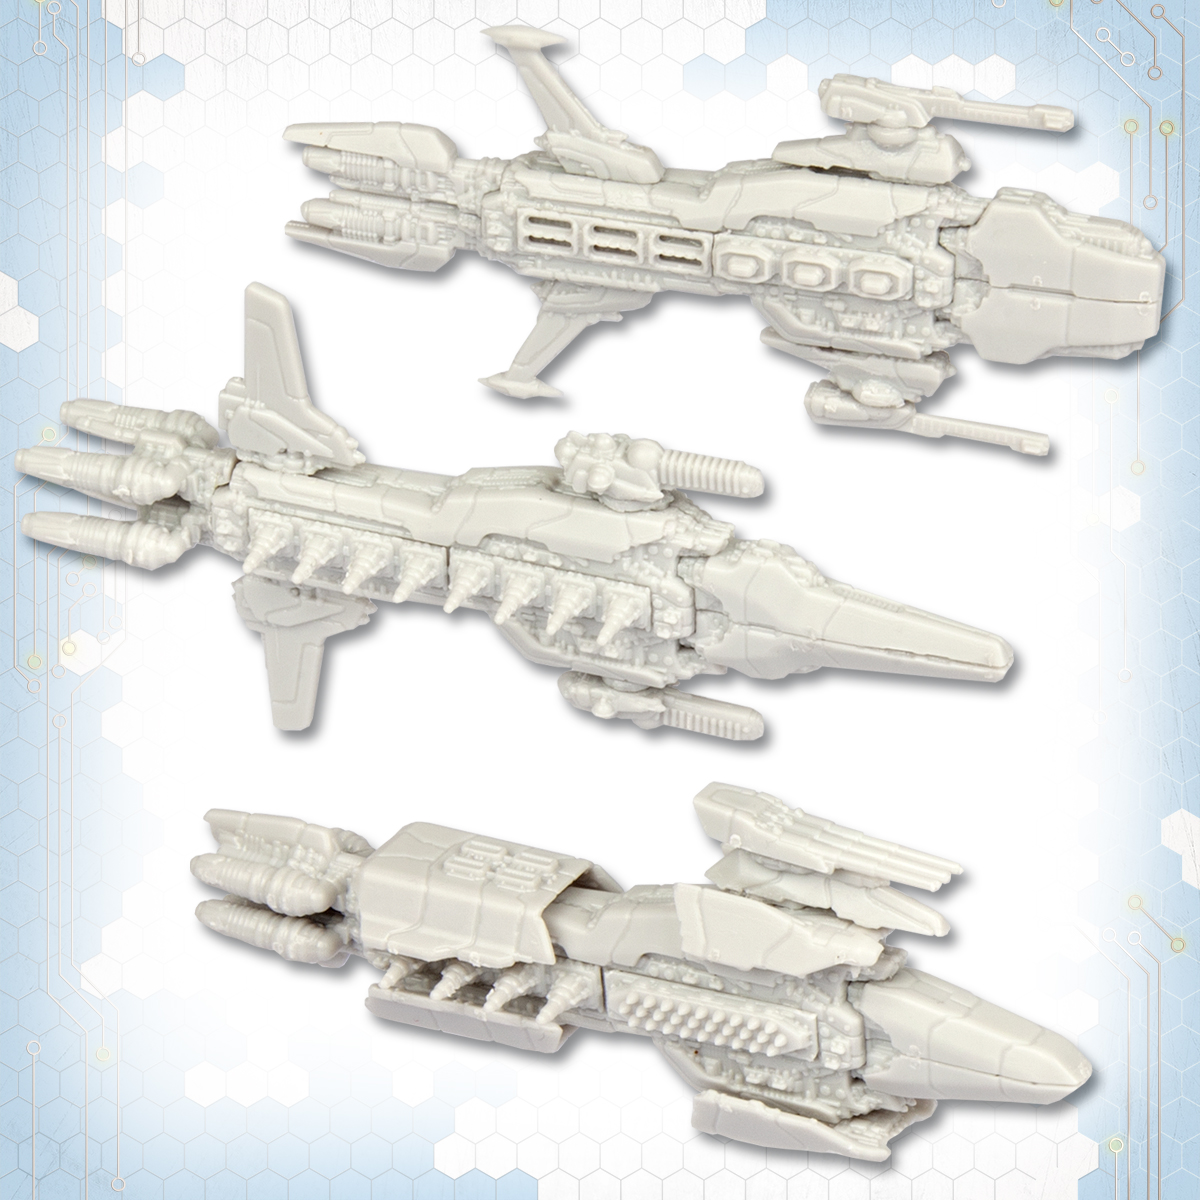
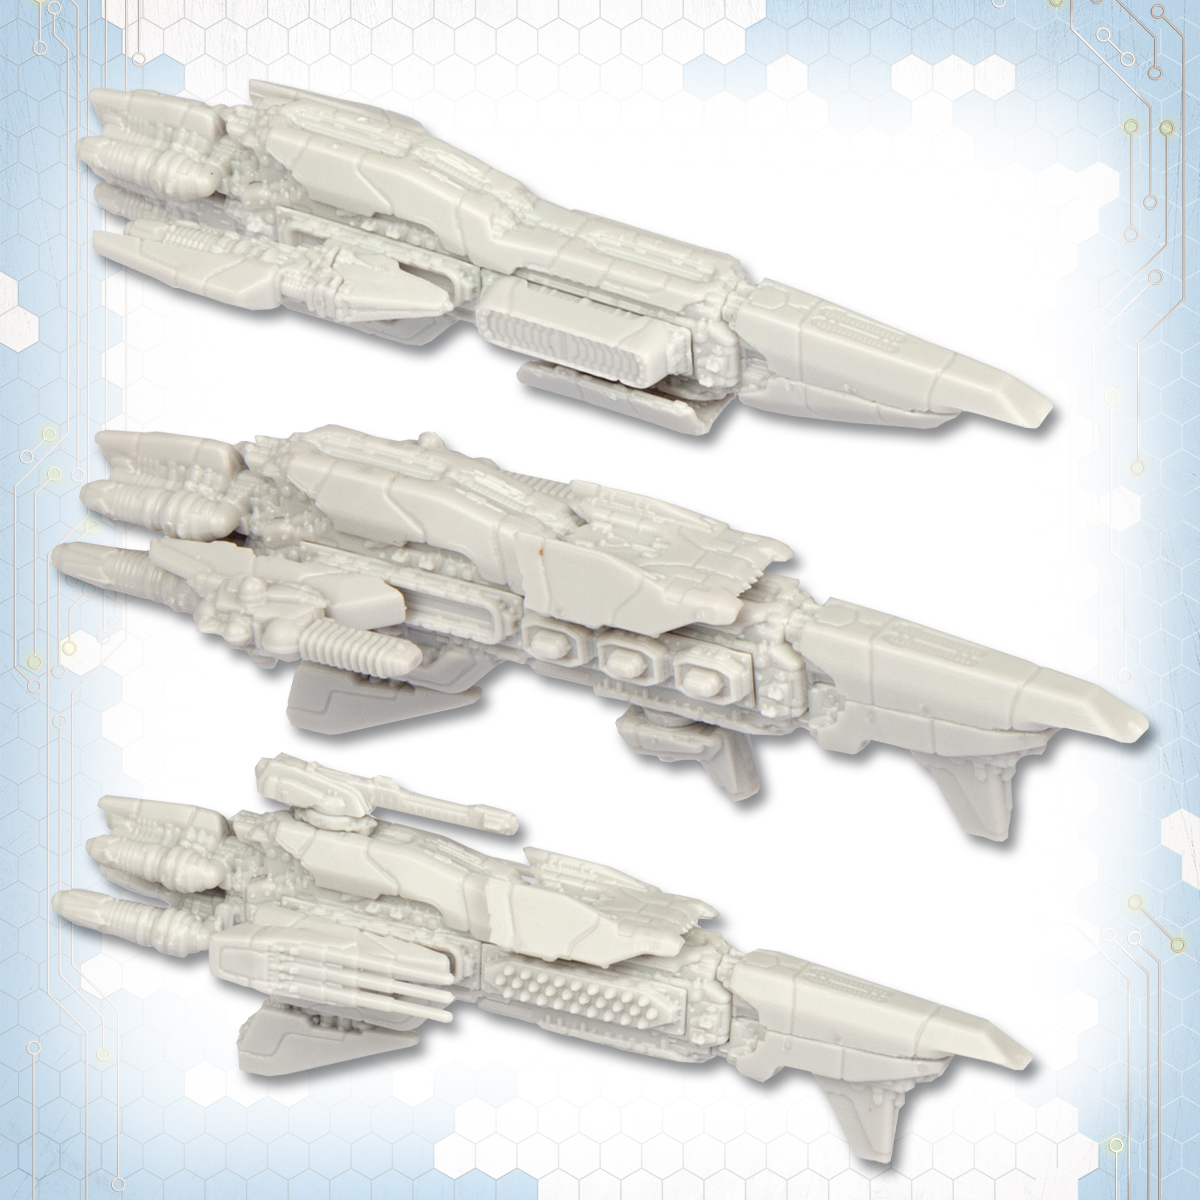
Mat’s Cruisers
Mat again has gone for some sort of scrappy looking ships, but with a lot of symmetry too. You’ll notice that he’s kept them looking quite neat by using identical prow and engine halves on each ship, allowing the middles to be the main focus.
The top ship is a medium Cruiser. It’s armed with two Mass Driver turrets at the front, along with a Hybrid Gun Bank at the front, and Fighters & Bombers launch bays in the rear broadside. At the back the extra cockpit pieces at a bit of extra detail.
The middle is a Heavy Cruiser. It has two Vent Cannon Turrets on the front, using the smallest turret mounts. The broadside mounts have two Artillery Cannon banks, and it has a pair of Scanner Array pieces on the back (still just counting as a single upgrade).
Mat has gotten a bit creative the bottom ship! This medium Cruiser has an Artillery Cannon Turret, Missile Bank, and Artillery Cannon Bank. It is completely enclose in Ablative Armour panels. I like that Mat added the turret on top of the armour plate – just a little cutting required and you have a real bulky front.
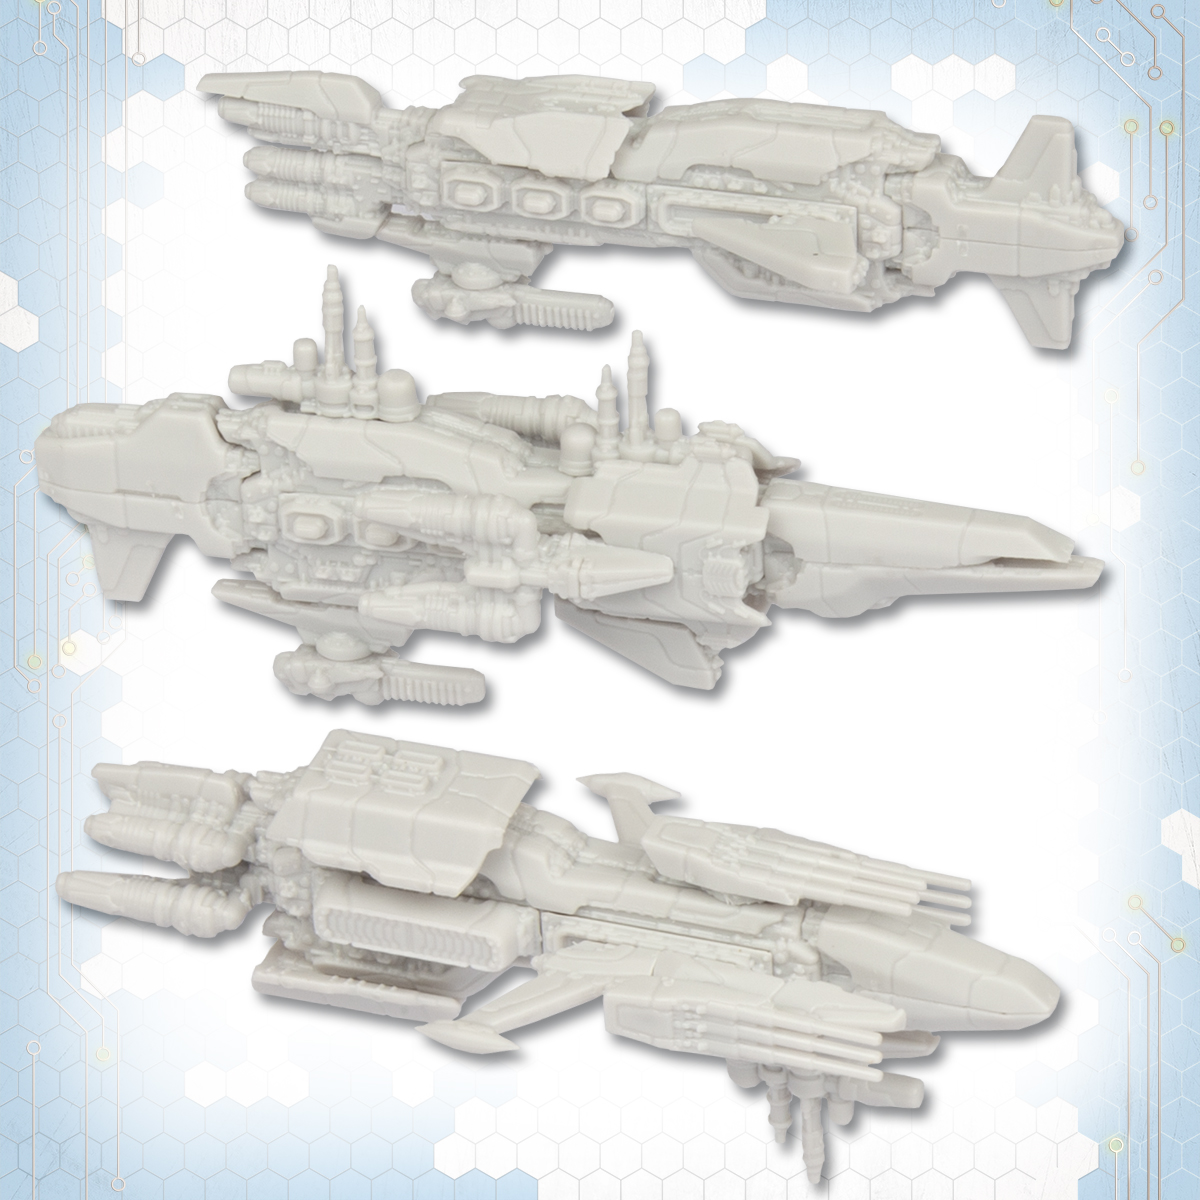
Scott’s Cruisers
From top and bottom heavy to sleek and elegant, Scott’s military fleet is expanding! One of the cool things you can do with the Cruiser sprue is use identical pieces to maintain a style throughout. Scott has used the same top prow and engine piece on each Cruiser, along with similar armour plates to make them look cohesive.
The top is a Light Cruiser, and is actually completely devoid of weaponry! This one has a Bulk Lander hanger in the front broadside, and Scott’s used the broadside rail to mount an extra engine to give the ship a Drive Refit. Finally, Ablative Armour on the bottom of the ship protects it from planetary volleys.
The middle is a massively armed Heavy Cruiser. It has twin Vent Cannon Turrets, again utilising the broadside rail mount. It also has a Hybrid Gun Bank and a Bombardment Mortar to shoot down to the landing zone. Ablative Armour finishes the heavy military look. Scott has rotated the Scanner Array piece backwards, counting it as just an extra gubbin.
Finally the bottom is another Heavy Cruiser (a popular choice!). This one swaps Hybrid Gun Bank for a Missile Bank, its Vent Cannons for Artillery Cannons, and takes the Bombardment Mortar from the bottom and switches is to a Mass Driver on the top.
Lewis’ Cruisers
My favourite part: talking about my Cruisers! I continued my quest to make the weirdest looking ships possible, with a few little conversions.
The top medium Cruiser is named Lady Luck. She’s lightly armoured, using only a single Ablative Armour plate. However, using the bulky end of the hull at the front helps to lend it some weight. I’ve added two Scanner Array parts to the front broadside using the rail mounts, and put a Hybrid Gun Bank on the back. Finally a Vent Cannon finishes it off on the bottom.
The Incredible Clunker is the middle Cruiser, which – funnily enough – is identically armed to the top Cruiser! This really shows the different shapes you can make while keeping consistency in weapons. This one makes use of the double prow, putting the engines on the broadside mounts. A little careful cutting has allowed me to wrap the engine mounts around some Ablative Armour, and using the wide engines means the Hybrid Gun Bank can shoot through!
My last Cruiser known as Kristen (after the wiig it looks like its wearing) is a Heavy Cruiser (I couldn’t resist), and I went a bit OTT, I’ll admit. This crazy contraption has 3 Artillery Cannon Turrets on the front, Bulk Lander bays on the Broadsides, and Ablative Armour wrapping round her booty. Again, with a little careful cutting I’ve managed to fit two rail pieces on each broadside, really making the most of those sliding rails.
So there we have them. All the ships! The next thing is for us to get some paint on these. Hopefully we’ll have time for that soon.
Tomorrow we’re going to look a little at the rules for the ships, and how building your Frigates and Cruisers works in game. Until then, remember you can pre-order your Resistance Starter Fleet right now!

This might be one of the more impressive DFC releases Ive seen since the game was first released. It really compliments the original range very well. Im extremely impressed and keen to get these in my hands to show locals.